Quantcast
Channel: Hydraulics – Vintage Tractor Engineer
Viewing all 15 articles
Browse latest View live

Ferguson T20 Hydraulics Won’t Lift

$
0
0

Patrick has picked up a copy of the TE 20 Hydraulics Tutorial and used the DVD to take a look inside his tractor and examine the system.

The TE20 in question will only lift a small weight on the rear linkage, and then only when the engine is running at high revs.  Patrick has inspected the pump components and (with the help of the DVD) concluded that everything is in reasonable condition.  However, he did notice that there were neither o’rings or gaskets fitted between the pump body and the valve blocks (as shown in the film).

This is likely to be the cause of the lack of pressure in the system.  Also Patrick should take a look at where the lift cylinder joins the top cover, as there should also be gaskets at this point.


Here is what Patrick says…

Hi Steve,

Many thanks for the T20 Hydraulics Video – Very well put together. I bought it because my T20 hydraulics are under-performing. I wonder if you might be able to give me a bit of advice?

It was restored and rebuilt by the students at Bicton Agricultural College as part of their engineering course. It is pretty much in excellent condition, but the links will not lift anything much above the weight of a man (not my cutter bar mover for example), and even then only if the engine is at full revs. As soon as the revs drop or the engine is switched off, the links start to fall. I have had a good look through, pulled the pump out and most things seem to be in good nick. No movement on the bushes etc. The one thing that I did notice is that, although the pump has an oscillator fork, there is no oscillator drive strip…. I think it is otherwise an old style pump – it has the old style combined relief valve and does not have spaces for o rings on the valve chambers suggesting it is the gasket type. Would the lack of an oscillator drive strip cause any real problems apart from making it more likely that the control valve will stick? The relief valve looks like it is in good shape, and so I am not sure that is the cause of the links dropping…. The only thing I can see that might be causing it is the fact that they didn’t put any gaskets between the valve chambers and the body of the pump. As it doesn’t have o rings (or space for them) either, would this be enough to let the linkage drop?

Cheers

Patrick

Patrick got back to us the next week to say…

Steve, you’re right. it is missing the gaskets between the top cover and lift cylinder too…. I’ll get a new set.


Ferguson TE 20 Hydraulics Tutorial Preview Video

$
0
0

We launched the  TE20 Hydraulics DVD last month and it’s already been sent all over the world to Ferguson tactor owners in…

Norway, Republic of Ireland, United States, England, Scotland, Netherlands, Northern Ireland, Wales, Isle of Man, Germany, Australia and Denmark.

Preview Video

Now things have settled down a little and Vintage Tractor Engineer has found a moment, we’ve produced a short preview video so people can get a feel of the content.

Here it is, enjoy…

Setting Lever Springs For MF35 Hydraulics

$
0
0

Making the settings on the lever springs for the Massey Ferguson 35 hydraulic system is quite a fiddly job, and the method is shown in detail on the MF35 Hydraulics DVD.  However, we just thought that a written description of the process may also help.

Setting levers of hydraulics on massey ferguson 35

The spring balance should be attached at the very end of the levers

So here it is…

  • Loosen retainer nut and eccentric cam.
  • Make sure quadrant levers are set at their sector marks. The round lever exactly over where it says ‘FAST’, the square lever next to where it says ‘DRAFT’ between the two dots and exactly where the arrow is.
  • Make sure the lift arms are in the fully lowered position. (that is upwards if the top cover is flipped upside down).
  • Make sure your spring balance is connected right at the top of the lever (if it is connected lower down the lever it will require more force to move the lever).
  • When 3 lb. of pressure is applied it should only just spring it into contact with the front of the slot in the lever support bracket.
  • Obviously adjustment of the spring pressure is made with the self-locking nut on the guide rods.


After this adjustment is made the eccentric cam can be moved around into firm contact with the cam arm and the nut tightened.  The above adjustments can be checked – move the operational lever from its sector marks into the response range, as the lever leaves the ‘FAST’ position the levers that we set with the spring balance should begin to move to the rear of the guides.
The adjustment is very fine and fiddly.  It is often right at the end of the movement of the levers where the 3 lb. can be achieved.
The setting is 3 lb. (1361 grams) of force to move the lever.  The reason for this is that this equals the force applied by the control valve spring when the assembly is fitted and connected in the tractor.  It is a very difficult setting to make and when using a spring balance the 3 lb. setting cannot ever be particularly accurate.

MF35 Hydraulic Oil Replacement

$
0
0

Andrew asks…

Hi,

Having completed a full strip down and rebuild of the engine according to the dvd I have now bought the Hydraulics dvd and am about to start looking at that end of the tractor.

I noticed that Ian mentions using multigrade oil in the gearbox/hydraulics. Having Googled this and looking at a few forums I am now confused. Should I be using 32 grade hydraulic oil or multigrade engine oil?

Also what about my log splitter which I use on my Ford 4000 with 32 grade hydraulic oil in it. If I use it on the Fergy with different oil then the oil will surely get mixed?

Thanks

Andrew

Hi Andrew,

In the Fe35, the recommended oil is SAE50 in our climate (or SAE 40 in colder climates). However, these days you would just use 15w/30 farm universal oil (or possibly even a dedicated premium transmission oil such as 10w/40). Definately not 32 grade hydraulic oil – that would be used in specific hydraulic systems (ie. without a tractor gearbox running off the same reservoir). Also definately not dedicated engine oil or any dedicated gear oils.

As for the mixing of the oil when you swap the log splitter between the two tractors?? Well that’s one reason why the oil should be changed at regular intervals – so that the correct oil in the tractor doesn’t get too diluted/contaminated with incorrect oil from other systems.

Hope that helps.

Kind Regards,

Ian

Massey Ferguson 65 Hydraulic Oil Grade

$
0
0

Here at VTE we often get questions from people as they go about their restorations.  Here’s one that has come in from Matthew…


Hello,

I’m in the middle of overhauling the hydraulics system on my MF65, using the fantastic DVD by Ian.

I’ve also got hold of a copy of the original MF workshop manual for the 65 (which also covers the 35 and 50 in the hydraulics section).

I’m a bit confused by the oil grade and I wondered if you could advise me.

In the manual it says the transmission/hydraulics should have 80 grade oil if it’s cold and 90 grade if it’s hot. I had thought I’d just put in multigrade 80/90 oil in. But I noted last night that you say in the film that it should have 50 grade oil but that 15/40 multiuse oil would be just as good. Since there’s a big difference between 80/90 and 15/40 oil I thought I’d ask you advice. 80/90 does seem very thick for external hydraulics, but it’s also for the transmission and axle… What do you think? Is 15/40 multiuse oil able to protect the transmission sufficiently?

Thanks for your help, and thank you for having produced the DVD. i’m intending to buy your engine overhaul DVD for the 4 cylinder MF835 engine (my donor 835 was dismantled partially years ago and has been outside for over a year (before I bought it) so I’m going to finish stripping it and it would be great to decide what’s still servicable and what needs to go for scrap.

I did find you hydraulics DVD very good and it’s good to hear your pieces of advice and experience during the process – things they don’t print in the manuals. Like you special tools for turning the top cover – works a treat.

I look forward to hearing from you soon. I guess you get a lot of questions, so I hope you will be able to find a couple of minutes to adivise me regarding the greasers, o-rings and oil choice.

Matthew


Hi Matthew,
Re: oil type, The original oil for the gearbox recomended for temperate regions is the SAE50 grade, with a move to SAE40 and then SAE30 as the temperature decreases and a similar move the other way as temp goes up. Nowadays we would suggest a move to a tractor universal oil ( 15w/40 or 15w/30) for climates like ours (UK). Even the  MF branded HC Plus used in the modern tractors is ok to use all the way back to the 35s. I feel that the 80 or 90 grades would be much too viscus for the hydraulics and unable to pass through the filter, however although not recomended the thicker grades may be a posibility for tractors operating in hot climates which are not fitted with the hydraulic system.
The spec for the 80/90 oil will be for the reduction hubs on the rear axle of the 65. These are sealed from the center housing.

CAD Drawing, Bracket For Hydraulic Top Cover Removal, MF35

$
0
0

Removing the hydraulic top cover on the MF35 (or any other tractor) is not an easy task, as the cover is quite heavy.  To help facilitate this Vintage Tractor Engineer has drawn a to scale sketch and added phtotos.


bracket


A number of people have used the drawings to manufacture their own bracket which has made the task a true one man operation.

Brian has very kindly provided a more accurate CAD drawing of the bracket, which is in superb detail.  He’s emailed it in to Vintage Tractor Engineer to make it available to everyone.  So here it is.  Just click the link below to download the pdf drawing (557kb)…

Bracket for Hydraulic Top Cover Removal – Massey Ferguson 35

This file may not open automatically in Adobe Reader.  Click the download icon in the top right hand corner of Adobe Reader to bring the file onto your computer screen.


Laser Cut Files

Brian has also sent the DWG / DXF cut files for anyone with access to a laser…

ZIP file of the pdf CAD drawing and the DWG / DXF cut files


Tractor Link Arms Will Not Lower

$
0
0

Your link arms will not lower.  It’s a frustrating problem.

We commonly associate hydraulic problems with poor pump performance and reduced or slow lift capacity.  However, we get quite a number of people reporting that their link arms won’t lower.

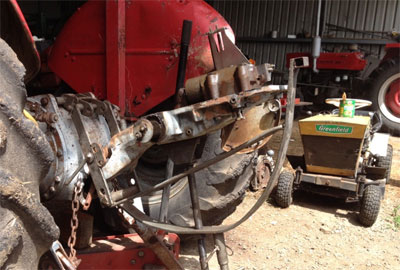
We’ve had an email from the owner of a Massey Ferguson 35 who has this problem, so we’re going to take a look at what could be the problem and what needs to be done to get the system working again.
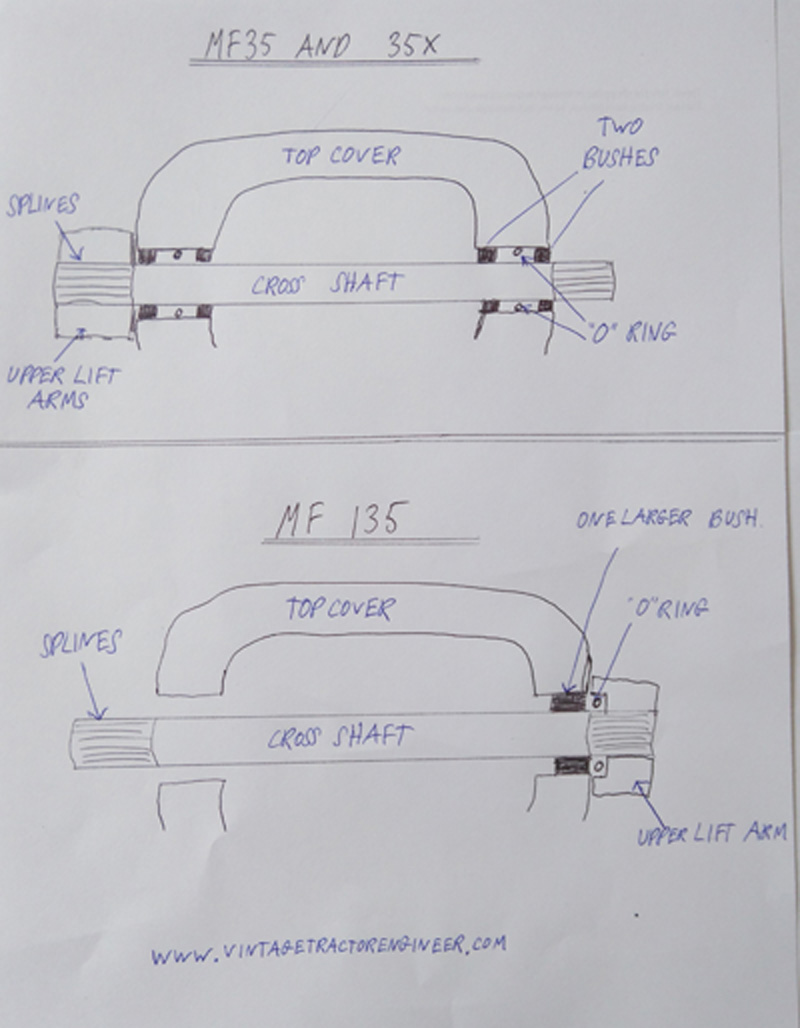
Lift Arm Shaft

The rate of drop of the arms should be set so that the lower links will just fall under their own weight when lifted by hand.  This is altered by adjusting the cap screws in the ends of the lift arms shaft.

If the screws are tightened too much, not only will it prevent the arms from lowering but it can also cause erratic action of the hydraulic system.

However, if a heavy implement is attached to the linkage and the arms will still not drop then it is likely to be related to the pump control valve.  We first need to uderstand how the position of the control valve raises and lowers the arms.

The Pump And Control Valve

The lower part of the pump is immersed in hydraulic fluid.  When the control valve is open it allows fluid to be sucked up into the pump and then on into the discharge passage (to pressurise the lift cylinder and lift the linkage arms).

MF35 control valve

The control valve

The contol valve slides to regulate the supply of fluid to and from the lift cylinder, the degree of which depends upon the relative settings of the manual control levers (and also by any control exerted automatically by the hydrauilc control mechanism).

The sliding control valve is essentially seperated into two compartments, one facilitating fluid inlet to the pump and the other compartment allowing an outlet from the high pressure chamber.

NOTE, the control valve is always held towards the drop position by a compression spring.

  • When the valve slides forward, its inlet slot passes within the suction chamber, hence the pump can draw fluid and pressurise the fluid into the lift cylinder.
  • When the valve is positioned centrally, both the inlet and outlet slots are positioned outisde of their chambers and hence the oil is locked in the system and the linkage arms remain stationary.
  • When the valve slides rearwards (by the force of the compression spring) the outlet slots are brought within the discharge chamber, thereby permitting oil to drain from the system (lift cylinder) back into the sump.

The rate at which oil drains from the system depends on how much of the outlet slot is moved into the discharge chamber.  In fact there are two pairs of slots in the discharge end of the control valve.  The second pair of slots are positioned further along the control valve, so if the control valve is moved further rearwards then all four slots discharge oil and thus the rate of drop of the lift arms increases.  The second pair of slots are also larger.
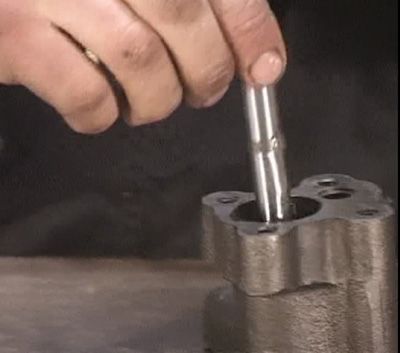
Close up of control valve

Inlet slots at the rear end of the vavle (LHS of photo), small outlet slots at front end of the valve (RHS of photo).
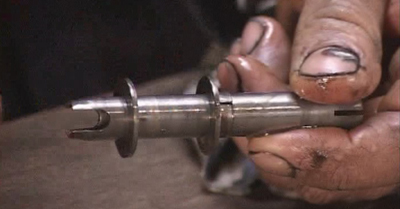
MF35 control valve

Control valve rotated 90 degrees to previous photo. Now we can see the second pair of larger outlet slots (RHS of photo).


What Can Go Wrong?

General Information

The control valve needs to be oil-tight to the bore of its sealing washers (the washers seperate the suction and discharge chambers).  The fit between the washers and the control valve is therefore extremely precision as it must seal under pressure but also facilitate the control valve to move.

To prevent the control valve from sticking there is an oscillating mechanism.  The oscillator is driven from one of the pump eccentrics as the drive shaft rotates.  It is not uncommon for the square end of the oscillator push rod to be rounded off.  This would cause the oscillator to be inoperative and so the rod would need to be replaced.
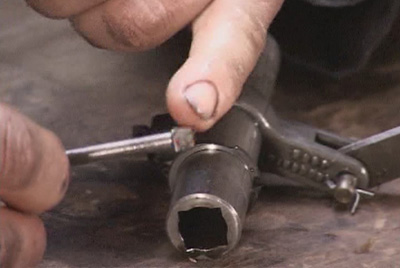
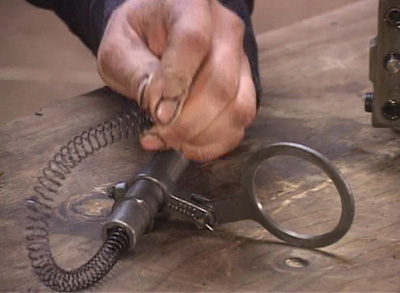
MF35 oscillator

Square end of the oscillator push rod

The exteme accuracy of fit between the control valve and its sealing washers means that any small particle of dirt could cause the valve to jam.  Extreme care should therefore be taken with cleanliness of the system.

  • Cleanliness of the fittings should be considered when connecting to the hydraulic ports (eg. connecting a tipping trailer or front loader).
  • Change transmission fluid every 750 hours (or annually).  Clean the pump filter (if fitted) and remove any deposits on the magnetic transmission casing drain plug.
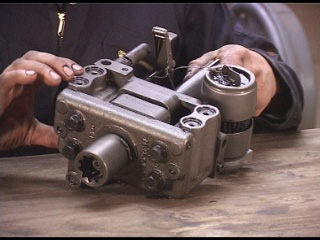
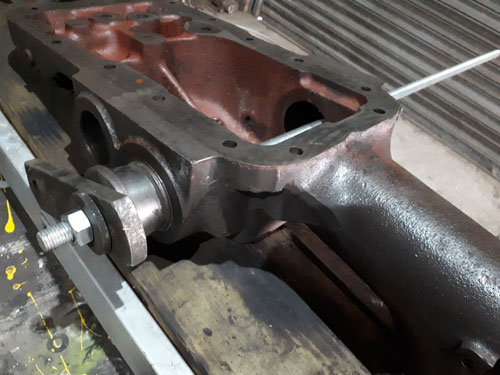
MF35 hydraulic pump

The hydraulic pump with strainer filter

Compression Spring And Control Linkage

Failure of the compression spring would mean that the control valve will not be pushed rearwards into the ‘drop’ position.  Failure of the compression spring is quite common.

MF35 hydraulic pump oscillator spring

The oscillator spring, although not a very strong spring, is quite long. It is possible to hold the spring pressure by hand whilst removing the retaining circlip.

Also, it is possible that a failure/problem/jamming of the internal control linkages would prevent the control valve to move rearwords into the ‘drop’ position.

Water Or Condesation In System

We’ve had a few people contact us to say that they have had probelms with milky oil (condensation built up over time and mixed with the water) and this, they suspect, has been the cause of their lift arms sticking up.  One owner reported the arms sticking whilst the temperature was below freezing.  Another owner reported the lift cylinder and its piston rusted together after just 4 months of not using the tractor – this owner had the milky oil and had to remove the top cover to free the piston.


Isolating The Problem

It is possible to drain some of the hydraulic fluid and remove the right hand transmission casing inspection cover to take a look inside the tractor.  Do not put your hands through the inspection hole if the engine is running.  It should be possible to see if the levers are moving the control valve and to see if the spring is returning the control valve to the rearwards (drop) position.

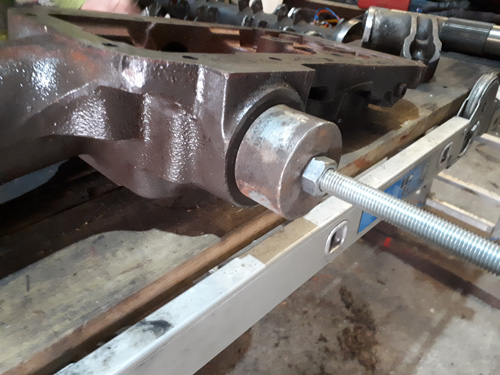
Removing the stand pipe would also isolate the pump, control valve and control linkage mechanism as the problem.  i.e. if the stand pipe is removed then the problem is either associated with the lift cylinder itself or the lift arms binding.  Beware, even with the engine stopped,  the hydraulic fluid in the stand pipe could be pressurised.

It is possible that the lift cylinder seizes in the ‘up’ position if the tractor has not been run for some time, rusting in place due to excess moisture in the oil and the transmission casing.  An example of this occuring is given in the comments section of this page.

Making The Repair

Obviously the necessary repair depends on what you suspect the problem to be.

Earlier in the article we looked at what to do to set the lift arms to prevent them from binding.

Repair of the control valve and its oscillating mechanism will require removal of the hydraulic top cover to access and strip the pump components.  This is an involved process and you may find the MF35 Hydraulics Troubleshooting And Repair DVD helpful to guide you through this process.
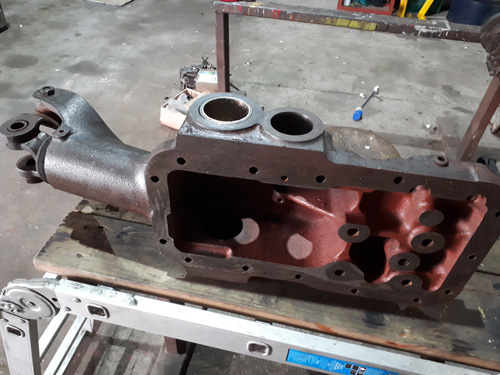
MF35 hydraulic pump

Pump inside transmission casing (top cover removed)

This article was based around the Massey Ferguson 35 tractor.  The information will also be useful for many other models that have a similar control valve and hydraulic system.


Improved Bracket – Hydraulic Top Cover Removal

$
0
0

Here at VTE we already have a simple bracket design for helping to remove the hydraulic top cover for the MF35 (the same principle would apply for many other models as well).

The top cover is a heavy component and the bracket is designed so that the cover can be removed and inverted for servicing by one person.  However, because this design of bracket uses a simple hinge action it isn’t particularly easy to remove the top cover without slightly catching the delicate levers against the transmission housing.

More Sophisticated Design

Dave has sent us some photos from his place in New South Wales, Australia, of his more complex bracket that he has designed.  Dave’s bracket differs in that it facliitates an initial straight and gentle lift of the top cover, before the bracket is then flipped over for servicing.

Here are the photographs of the design (many thanks Dave!) …


Hydraulic cover removing bracket


MF35 hydraulic servicing


Tractor hydraulic servicing tool


Massey Ferguson service tool


tractor hydraulic repair tool


Broken Hydraulic Cylinder

$
0
0

This photo has been sent in by Steven.  He has a French built MF835, which is basically very similar to the MF35 tractor (there is a modified version of the Standard 23C engine in these tractors).

When he was lifting …

Replacing TE-20 Top Cover

$
0
0

VTE got an email recently from a gentleman who had some irreparable damage to the top cover on his 1955 TEF-20 diesel.

The only sollution was to find a second hand replacement.  Of course there are probably lots of donor …

MF35 Draft Control Spring Nut

$
0
0
  1. DaveW

    Hi folks,
    Ihave 2 questions about the draft spring nut,
    What is behind the grub screw on the side of the housing, I have to drill the screw out as the hex socket is rounded off and the screw is rusted in tight.
    Also, is there a tool available to undo the nut or do i have to make something up.
    Steve, i have ordered the video, just cant wait for it to turn up,
    thanks all,
    Dave

  2. Fergie Man

    Dave behind the allen headed screw there is a piece of lead shot which squashes onto the adjusting nut to keep the nut tight. There is a special tool available but you can use a hammer and punch to turn the nut round using the cutouts on the outer rim…..Regards…Geoff

  3. DaveW

    Hi Again, Thanks Fergie Man.
    Ok I’ve drilled out the allen headed screw, something very hard is behind the screw, I think its a ball bearing, but i definitely cant drill through it, not even making a dent in it, there is still a ring of the screw holding it in place due to the tapper of the drill bit, going to reshape the drill bit to be concave so i can cut the last thread out of the screw and try and retrieve the ball.

    I tried using a punch and hammer on the nut, but I can’t shift it. Possibly still too much pressure from the plug, I’m still open to suggestions.

    Regards, Dave

  4. DaveW

    Hi Again,
    Ok, with a great deal of exasperation, (big mallet, punch and frustration), I undid the nut and removed the draft control spring assembly, the cylinder was chock full of rust dust, Fergie Man is right, there is a lead pellet sqaushed into the thread area against the nut, but still can’t get it out or drill through it, something like a ball bearing between the pellet and the grub screw, looks like oxy torch time to melt it out.

    Removed the pin from the yoke when undoing the plunger but still tore the shaft apart at the end of the thread, rusted solid, lucky sparex and Bareco sell spare parts for all the components so, new shaft, nut and boot ordered, drilled out the yoke and re- tapped it.
    Thanks for the help,

    Dave


TEA-20 Hydraulic Relief Valve Problem

$
0
0

Broken hydraulic top covers are a relatively common problem with Ferguson TE-20 tractors.  The easiest solution for most people is to source a second hand component.

The earlier tractors had the relief valve fitted to the pump, whilst the later tractors had the valve integrated into the top cover.


Hydraulic top cover, Ferguson TE-20 tractor


It is therefore necessary to ensure that when replacing a later style top cover (with the integrated releif valve) that either the same design of top cover is used or a releif valve is fitted into the system somehow.

So how can this be achieved?


Option One

We’ve already mentioned that the earlier pumps had a releif valve fitted to the pump itself.

The later pumps had a blanking plate over where the valve was fitted, so it is simply a case of removing the blanking plate and fitting a new relief valve.

This is the option that Keith took with his  TEF-20 when faced with this situation.


Option Two

This isn’t as neat as the internal valve option,  but it would never the less do the job and get your tractor going.

An off-the-shelf pressure releif valve could be plumbed into one of the external ports with a return back to the reservoir.  Normally returns would be plumbed in below the oil reservoir  to prevent foaming, but this shouldn’t be strictly necessary for the odd occasion that a relief valve would operate.

Once fitted, start with it slack and then adjust upwards to the specified pressure using a pressure gauge.


The Question That Prompted This Post

A question came in from New Zealand which prompted us to write this post.  Here’s the question…

Hi from New Zealand,

I purchased a copy of your DVD on TE-20 Hydraulics a couple of months back. It is excellent and I could not have asked for more.

My problem is salt water has got in via the PTO and I have had a major refurbishment and cleanup on my hands.

All ready to put it back together and have hit a major problem with the top lift cover. The arms are frozen and clearly salt water/emulisified oil has meant a total sieze up. We cannot shift the arms off to get the bushes or spline out. Incidently my TEA is a 1956 serial 517+. It was one of the last 750 ever built.

The solution was to purchase a replacement top cover. It arrived last week and sadly is off an earlier model, and the poppet type safety valve is missing. Mine does not fit as its the later ball type per your video. I am tearing my hair out as I cannot locate the correct poppet valve. Seems there is more than one size of earlier editions. My new replacement cover has a much smaller diameter hole.

A question for you>>>

Can I just blank it off and have no valve at all?  I only use the Fergie for boat launching so there is no extreme hydraulic pressure being exerted on the unit anyway. If that’s not possible, then can I modify the ball type valve assembly, or the larger diameter poppet valve that I am the proud owner of!  Thanks for any assistance.

Answer

It is clearly too dangerous to have a system without a relief valve in there.  One mistake by the operator (or an unsuspecting operator) and you could easily end up looking for another top cover; or worse still, have an accident.

If you are unable to source the parts you need then hopefully one of the options highlighted above will work for you.

The Vintage Tractor Engineer (VTE)

MF35 and MF135 Cross Shaft Arrangement

$
0
0

The cross shaft on the MF35 and MF135 tractors are held with bushes and sealed with ‘o’ rings.

The MF35 has two smaller bushes with an ‘o’ ring inbetween them.

The 135 has one larger bush.  The ‘o’ ring then fits to the outside of the bush, and this is facilitated by having a top lift arm casting which is of a different design.

See diagram below.

MF 35 cross shaft sketch


How this relates to the MF35 Hydraulics DVD

The tractor that we used in the MF35 Hydraulics DVD had actually had replacement aftermarket top lift arms fitted.

These aftermarket lift arms had been manufactured to fit both the MF35 and MF135 tractors.  Hence, they are able to take the ‘o’ ring to the outside of the bush as per the 135.

This was noticed by one of our DVD customers, who asks:-

Hello Steve & Ian,

I have all of your excellent DVDs and recently have rebuilt the hydraulic pump in a 1962 MF35 which I have been restoring. This is my first attempt and all has gone well (I think!) thanks to your DVD – would never have attempted it without the DVD! Could not recommend it more highly.

Just one question – about the cross shaft for the upper lift arms.

Your DVD shows “O” rings being fitted to the shaft before the arms are put back on – there were no “O” rings on my shaft when I took the arms off and also the same on a 1963 MF35X which is another of my projects.

I see from the MF35 workshop manual that there is an “O” ring further in between the 2 bushes either side, although my 135 manual which shows only one larger bush each side shows an “O” ring on the outer side as per your DVD.

I am a bit confused!

Kind Regards,

J. O.

So Vintage Tractor Engineer is sorry for the confusion.  We should have made it clear that these top lift arms were not as per the original design for the 35.

The correct arrangement for the MF35 is for two smaller bushes with an ‘0’ ring inbetween them.  No ‘o’ ring to the outside of this (although if you have aftermarket top lift arms like were fitted to the tractor in the DVD, then you could put another ‘o’ ring in.

Hydraulic Bracket

$
0
0

We have been recently asked how to make the bracket which fixes on to the rear of the MF35 tractor which makes it easy to ‘flip’ over the hydraulic top cover on the MF35 tractor.

This is a useful tool if you need to remove the top cover yourself and can’t get anyone to help you, as the top cover is a very heavy component.

We wrote about this before, giving some photos, dimensions, CAD drawings etc.  You can find the information for the MF35 hydraulic top cover removal tool here.

There is also a more complex bracket and tool which was manufactured by Dave.  The tool that Dave manufactured helps to withdraw the top cover slightly before flipping it over.

MF 230 Collar Fitted To Top Cover

$
0
0

Last week we got called out to a Massey Ferguson 230, which works as a scraper tractor on a large dairy farm. The tractor gets used daily, and it’s very much a working machine.

The cross shaft had worn through its bushes and into the casting of the hydraulic top cover. Seemingly it had been like this for some time!

Eventually, the internal hydraulic control linkages and draft control became so worn that the whole system stopped functioning.

Although the cross shaft had worn through the bushes, it was still possible to locate the original positioning of the bushes, so it was reamed out, a sleeve fitted and new bushes fitted. The cross shaft was a slightly too tight fit, so a small amount was honed off the bushes, debris blown out with airline, then fitted the cross shaft back in. The cross shaft needs to be able to rotate freely enough so the linkage arms can drop under their own weight.

A simple home-made puller helped to pull the bushes into their correct position.

This happened to be a Massey Ferguson 230 tractor, but the top cover is very similar on the MF35, 100 series, 200 series, 300 series, 500 series and even the TE20 tractors.

After renovating the control linkages – the tractor was back to work.

Here’s a few photos of the top cover…

Using a puller to gently pull the bushes into position
Gently easing in the new bushes using a home-made puller.
Close up of the puller working on the bushes
Puller fitted against the top cover
‘Fixed’ end of the puller, against the casting.
Massey Ferguson 230 or 240 hydraulic top cover, undergoing refurbishment
Bushes fitted.
Sleeve fitted to worn hydraulic top cover of MF230 or 240 tractor
Close up photo of the standard bush fitted inside the sleeve – that had been pressed into the casting to take up the wear.
Honing the new bushes, so the cross shaft rotated freely, MF 230 or 240 tractor
The sleeves and bushes needed to be a good tight fit. We’d just slightly over done it, so the cross shaft was just a little too tight. A quick hone, and blow out with an airline to remove the debris, then it was just right!
Cross shaft, to fit linkage arms to. MF tractor
Remember there is a master spline.
Inserting cross shaft back into hydraulic top cover of MF230 or MF240 tractor

The post MF 230 Collar Fitted To Top Cover first appeared on Vintage Tractor Engineer.


Viewing all 15 articles
Browse latest View live